






























.avif)

The Step-by-Step Guide to Residential Steel Framing Installation
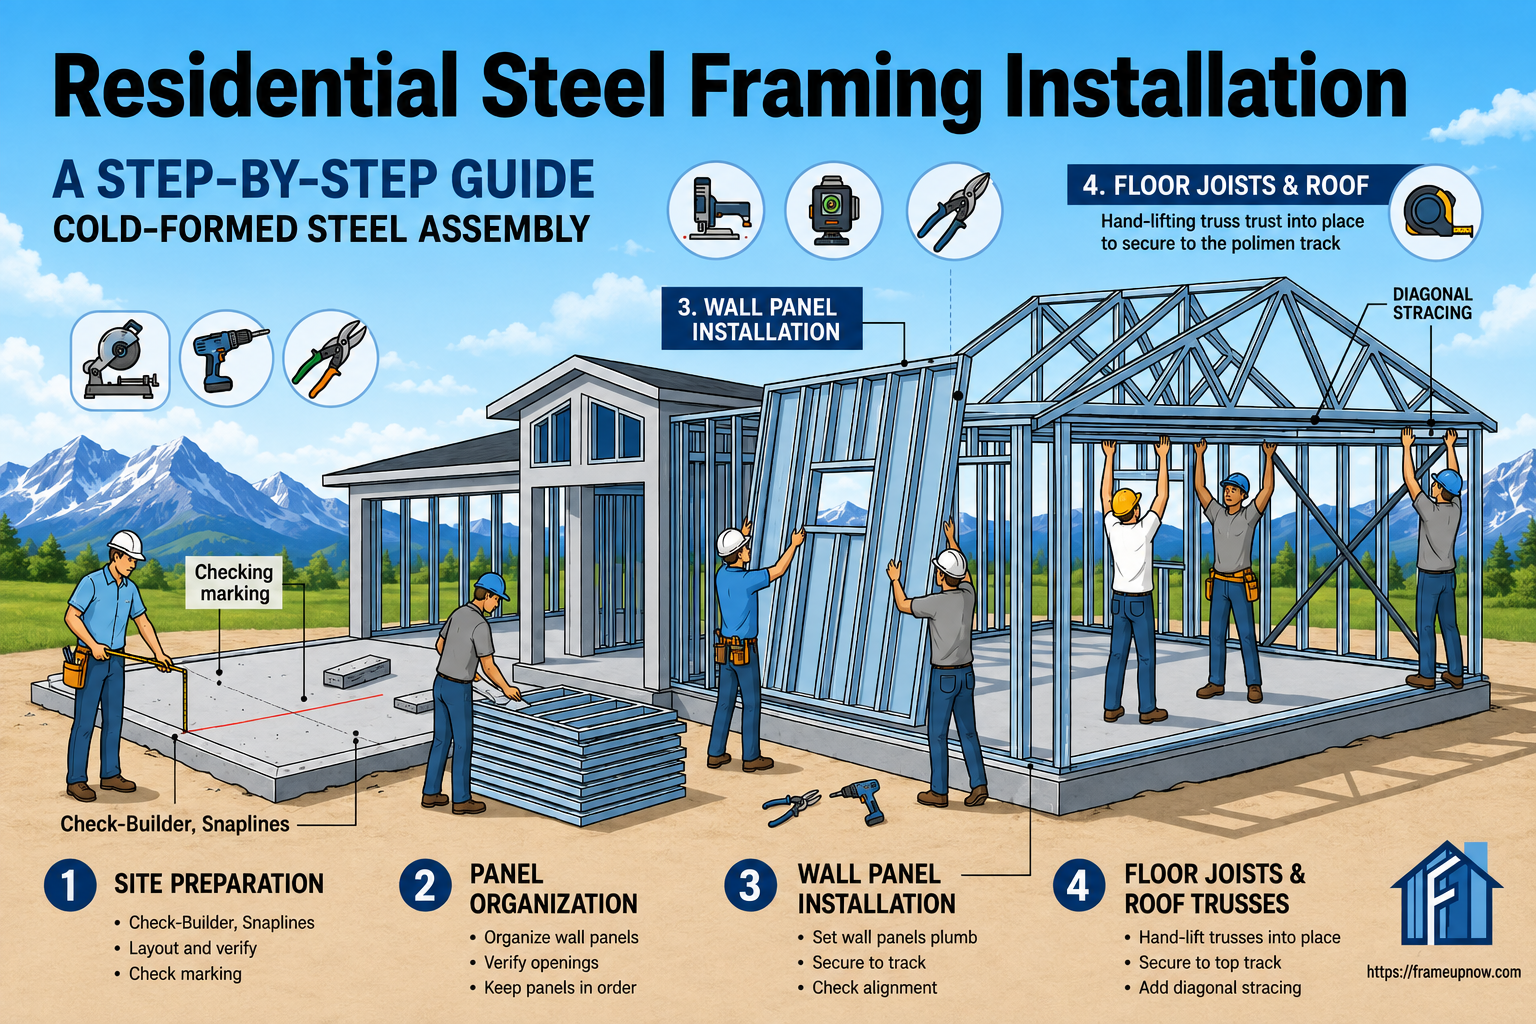
The Step-by-Step Guide to Residential Steel Framing Installation
Most homeowners assume steel framing is reserved for commercial projects and licensed professionals. That assumption is outdated — and it costs people money in unnecessary labor fees. Cold-formed steel (CFS) framing is designed for efficient, accessible assembly.
The system is sequential and logical. Components arrive pre-cut, pre-labeled, and organized by wall section. Once you understand the installation order, the build becomes a matter of disciplined execution — not specialized expertise.
This guide covers every stage of residential CFS framing installation. We go from slab cure to the last truss set.
It follows the same sequence used in FrameUpNow's engineered steel kit system. That system has guided owner-builders and small framing crews through residential projects across California and the Southwest.
Who This Guide Is For
This guide is for owner-builders, first-time CFS crews, and property owners overseeing an ADU or home build.
If you've framed with wood before, you'll find the logic familiar. Key differences exist in tools, fasteners, and panel handling. This guide covers all three.
Before You Start: Understanding Your Engineering Plans
Every FrameUpNow kit comes with a full engineering plan set. It specifies panel placement, fastener patterns, brace locations, and header sizes for your specific structure. Read it before your first panel goes up.
The plan set is the authority on every structural decision. Don't improvise fastener counts or brace locations. Deviations from the engineering documentation create compliance issues at inspection and structural risk in service.
If anything in the plan set is unclear, call FrameUpNow support before starting. It's faster to resolve a plan question over the phone than to discover a misreading mid-installation.
Step 1: Tools and Equipment You'll Need
Cold-formed steel framing requires a smaller tool inventory than most people expect. No welder. No crane. The core list is compact.
Cutting tools: Tin snips — straight-cut and angle-cut — handle most field trimming. A metal chop saw speeds up repetitive cuts; it processes multiple studs simultaneously. Avoid angle grinders: they create metal burrs that interfere with fastener seating.
Screw guns: Use a dedicated screw gun set to 2,500 RPM. Drywall guns run at 4,000 RPM or higher and strip self-tapping screws before they fully seat. A stripped stud-to-track connection is a compromised fastener you may not catch until inspection.
Layout tools: Chalk line, 25-foot tape measure, speed square, and a laser level. Layout lines drive every panel placement decision. A quality laser level pays back immediately in speed and accuracy.
Holding tools: Four locking C-clamps at minimum. These hold panels in position while you fasten. Buy quality — cheap clamps lose grip under repeated use.
Safety gear: Cut-resistant gloves are non-negotiable for panel handling. Steel framing edges are sharp. Add safety glasses and steel-toed boots.
What you won't need: A crane. FrameUpNow CFS trusses are engineered for hand-lift installation. Crane rental and operator run $800 to $1,500 per day on residential projects. Eliminating this cost is one of the clearest financial advantages of a steel kit.
Step 2: Site Preparation
Your concrete slab must be fully cured before framing begins. Standard concrete reaches full design strength at 28 days. Starting panel installation on an uncured slab risks anchor bolt pullout under load — don't compress this timeline.
Check the slab for level and flatness using a laser level or a 10-foot straightedge. Variations greater than 3/8 inch over 10 feet need to be addressed before panels arrive.
A level foundation is the single biggest predictor of clean, fast framing. Walls that don't sit plumb from the start create cascading alignment problems through every subsequent phase.
Confirm the position of all anchor bolts and embedded straps against your engineering plans. This is your final verification window before steel arrives. A misplaced anchor bolt found after panel delivery forces field modifications that add time, cost, and inspection questions.
Step 3: Laying Out Snaplines
Snaplines define wall position. Get this right and every subsequent step is faster. Get it wrong and you're chasing alignment problems through the entire project.
Start at a corner. Establish a square reference using the 3-4-5 method. Measure 3 feet along one wall and 4 feet along the adjacent wall.
The diagonal between those endpoints must be exactly 5 feet. If it's not, adjust until it is. Use larger multiples — 9-12-15 or 12-16-20 — for greater accuracy on long wall runs.
Snap chalk lines for both the inside and outside faces of all exterior walls. Interior partition lines come after exterior panels are plumbed and braced.
Mark door opening locations on the slab before panels arrive. Measuring from the plan set mid-installation slows the crew down.
Step 4: Delivery and Organizing Your Kit
FrameUpNow delivers a pre-cut, panelized cold-formed steel skeleton to your jobsite. Exterior wall panels arrive labeled by section. Trusses are bundled separately.
All hardware — screws, straps, clips, and connectors — is included. Organize before you build. Lay exterior panels in installation sequence: front wall, rear wall, left, right.
Keep trusses bundled and protected from foot traffic. Position floor joists and beams near their installation zones. Don't create a central pile the crew will sort through mid-install.
Check the delivery against your Bill of Materials immediately. Note any damaged or missing components and contact FrameUpNow support before framing starts.
Discovering a missing header mid-installation creates a full-stop delay. A five-minute inventory check at delivery prevents hours of downtime.
Step 5: Assemble Your Crew
Residential CFS framing doesn't require a large professional crew. Three to five people with basic construction ability can frame a standard single-story home. FrameUpNow calls this "invite your friends."
The FrameUpNow DIY resources document full residential builds done by small, non-professional crews. Steel panels are lighter than equivalent wood framing members.
Two people hold a panel while a third drives screws. No mechanical lifting required for wall panels.
Assign roles before the first panel goes up. One person handles layout verification and quality checks. Two people position and hold panels.
One person operates the screw gun. Clear role assignment before starting eliminates the confusion and double-handling that slows small crews.
Step 6: Installing Exterior Wall Panels
Exterior walls establish the structural perimeter and provide the reference for everything that follows. They always go up first.
FrameUpNow exterior panels use 18-gauge cold-formed steel — heavier than interior panels to handle wind, lateral, and seismic loads. Each panel arrives with pre-punched holes sized for electrical conduit, plumbing lines, and HVAC runs. No field drilling for utilities is required.
Trades working CFS for the first time consistently report faster MEP rough-in than wood. The penetration locations are already there.
Installation sequence for exterior panels:
Set the bottom track (floor track) to your chalk line. Fasten it to the cured slab using concrete anchors per your engineering plans — typically every 24 inches. Hold the track tight to the snap line before fastening; don't assume the slab edge aligns with your layout.
Stand the first exterior panel in the bottom track and use C-clamps to hold the top in position. Verify plumb with a level, then fasten the top track. Repeat for each panel section in sequence.
Do not advance to the next wall until the current section is plumbed, fastened, and temporarily braced. A wall that leans slightly before permanent bracing can shift under its own weight. Plumb it, brace it, lock it — then move forward.
Step 7: Installing Interior Wall Panels
Interior panels use 20-gauge cold-formed steel — lighter than exterior panels. Partitions carry vertical load but not lateral wind and seismic demands. Installation moves faster once the exterior perimeter is locked in.
Follow the same bottom-track-first sequence used for exterior walls. Most floor plan dimensions are wall-face-to-wall-face — verify which face your snap line represents before fastening the track. Snapping to the wrong face shifts every downstream dimension.
Set headers at the correct height per the plan and fasten with the specified screw pattern. Headers are verified at inspection — a non-conforming header requires rework after panels are in place. Don't improvise header sizing or height.
Step 8: Cross-Bracing
Cross-bracing gives a CFS frame its lateral rigidity. Without it, the frame has minimal resistance to racking from wind and seismic forces. This is structural — not optional, and not something to estimate by eye.
Your FrameUpNow engineering documentation specifies every brace location, strap size, and fastener pattern. Diagonal flat steel strap bracing is the most common method for residential CFS.
Straps run at a 45-degree angle between studs, fastened at each intersection with the specified screw count. Follow the plan exactly.
In California seismic zones, shear panels supplement or replace strap bracing in high-demand wall sections. Shear panels transfer lateral loads to the foundation. Install all shear panels before moving to roof structure — they're harder to access once trusses are in place.
Step 9: Truss Installation
This is where CFS construction most visibly separates from wood framing. Wood roof trusses require a crane — $800 to $1,500 per day plus operator and scheduling coordination. CFS trusses do not.
FrameUpNow trusses are engineered to be hand-lifted by three to four people. Each truss seats on the exterior wall top track.
Position and fasten per the truss layout plan — typically at 24-inch on-center spacing. The geometry is designed for crew access and stability during placement.
Truss setting sequence:
Start from one gable end. Position the first truss, verify plumb, and tack it temporarily.
Use a temporary horizontal brace across the top chord. Hold the first trusses plumb while you set subsequent ones.
Work from one end to the other. Once trusses are fastened and aligned, install permanent truss blocking. Add any required ridge or hip connectors per the engineering plan.
At this point, your structural skeleton is complete. Sheathing, weather barrier, roofing, and all finish trades follow in sequence.
After the Frame: What Comes Next
Once the steel skeleton is up, finish phases follow standard residential construction order.
Exterior sheathing and weather barrier: Structural sheathing attaches to CFS framing the same way it attaches to wood. CFS walls are dimensionally stable — no bowing, twisting, or shrinkage. Sheathing goes on flat and clean with no shimming required.
MEP rough-in: Electricians, plumbers, and HVAC contractors run systems through the pre-punched holes in CFS panels. The FrameUpNow benefits page notes that most trades report CFS rough-in moves faster than wood once they've done it once.
Insulation: Open-cell spray foam performs well with CFS framing. When combined with a continuous exterior insulation layer, it addresses the thermal bridge at the steel stud face effectively.
Drywall: Use 1-1/4 inch self-tapping screws designed for steel. CFS walls are straight and plumb, so drywall goes on faster with fewer callbacks.
Exterior cladding: Brick, stucco, vinyl siding, and composite panels all attach to CFS framing without modification. Straight walls mean cladding installs faster and finishes cleaner.
Throughout the finish phase, your FrameUpNow BIM-derived Bill of Materials gives you exact quantities for every line item. That includes drywall sheets, insulation board footage, and cladding square footage. Take the list to your supplier and know what you're ordering before spending a dollar.
Quality Checks to Run at Each Stage
Installation speed matters — but catching errors early matters more. A mistake discovered at framing is cheap. The same mistake discovered at drywall is expensive.
After snaplines: Pull diagonals across the entire slab. The two diagonal measurements should match within 1/4 inch for the building to be square. A discrepancy here compounds through every phase.
After exterior wall panels: Check plumb on every wall with a 4-foot level before moving to interior layout. Check that all top tracks are at the same elevation — use a laser level across the full perimeter. Confirm that all anchor bolt connections are fastened at the correct pattern before calling the exterior perimeter complete.
After cross-bracing: Verify that every strap is fastened with the required screw count. Missing fasteners in bracing don't show up visually — count them.
After trusses: Check that every truss is plumb and evenly spaced before permanent fastening. Spacing errors that get locked in permanently affect roof sheathing, ventilation blocking, and every roofing trade that follows.
Frequently Asked Questions
How long does it take to frame a residential home with cold-formed steel?
A typical single-story home frames in 5 to 10 working days with a crew of three to five people. Crew familiarity with CFS and plan complexity affect the timeline. Panelized delivery eliminates the on-site cutting time that adds days to stick-built framing.
What is the 3-4-5 method and why does it matter for CFS layout?
The 3-4-5 method is a Pythagorean field technique for squaring corners. Measure 3 feet along one wall and 4 feet along the adjacent wall. The diagonal between those points must be exactly 5 feet for a true 90-degree angle.
Use multiples like 9-12-15 or 12-16-20 on longer wall runs for greater precision.
Do I need a crane to set steel roof trusses?
No. Cold-formed steel trusses are lighter than equivalent wood members and engineered for hand-lift installation. A FrameUpNow crew of three to four people sets trusses without crane equipment. That eliminates both the rental cost and scheduling dependency.
How does cross-bracing in a CFS frame differ from wood bracing?
Wood frames use let-in diagonal bracing or structural sheathing for lateral resistance. CFS frames use flat steel strap bracing or shear panels. Every location, strap size, and fastener count is specified in the engineering plans. There's no guesswork.
Can steel framing get wet during installation?
Cold-formed steel panels are galvanized or zinc-coated for corrosion resistance. They won't warp, swell, or twist when exposed to rain. You can continue framing in wet conditions without worrying about panel distortion.
This is a meaningful advantage over wood in wet climates or tight weather windows.
What gauge steel is used for exterior versus interior walls?
FrameUpNow exterior wall panels use 18-gauge cold-formed steel. Interior panels use 20-gauge. The heavier exterior gauge handles wind, lateral, and seismic demands.
The lighter interior gauge is structurally adequate for partition walls and keeps the overall frame weight manageable for hand installation.
Conclusion
Residential CFS framing installation is a disciplined, sequential process — not a complicated one. The engineering is done before the steel ships. The hardware is included.
The panels are pre-cut and labeled. Your job is assembly: follow the plan, maintain accuracy, and call for support when questions come up.
FrameUpNow builds that support into every kit. You get IBC-engineered documentation, a BIM-derived Bill of Materials, and step-by-step video tutorials. A support team answers framing plan questions throughout the build.
Ready to see what your project would cost before you commit? Browse FrameUpNow's plan catalog or book a free consultation with the team.